GearFrame Guides · Analog Photography
The Complete Guide to
Analog Film Cameras
Everything you need to understand film photography — from the chemistry of a frame to loading a roll in the dark, choosing the right stock, and getting prints back from the lab.
35mm Film
Medium Format
SLR / Rangefinder / P&S
Loading & Storing Film
Getting Film Developed
Digital cameras are objectively better at almost every technical task — faster, sharper, cheaper per shot, infinitely adjustable in post. And yet film photography is enjoying its biggest revival in decades. Sales of film stock at Kodak and Ilford have risen year-on-year since 2012. Cameras like the Olympus Stylus Epic regularly sell for more used than they cost new. The Fujifilm Instax Mini outsells most DSLRs. What's going on?
Part of the answer is constraint. When you have 36 exposures and no instant preview, every shot means something. Part is character — the grain structure, color rendering, and tonal compression of film are genuinely different from digital, and many photographers find them more pleasing. Part is simply the joy of the process: the ritual of loading a roll, the anticipation of waiting for results, the tangible negative you can hold in your hand.
This guide explains everything you need to actually shoot film — formats, camera types, how to load and expose correctly, and how to get your rolls developed.

📷
Upload a photo to Cloudinary as analog-film-guide-intro
Suggested: someone shooting with a film camera — street, golden hour, or darkroom.
Shooting film demands intention — with 36 exposures on a roll, every frame is a considered decision.
At its core, photographic film is a strip of plastic (acetate or polyester) coated with an emulsion — a layer of silver halide crystals suspended in gelatin. When light hits these crystals, it triggers a photochemical reaction that forms a latent image: an invisible record of the exposure. The developer solution amplifies this reaction into a visible image, and the fixer makes it permanent.
🧪
The emulsion
Silver halide crystals (silver bromide, chloride or iodide) are light-sensitive. Bigger crystals = faster film (higher ISO) but more visible grain. Smaller crystals = finer grain, lower ISO.
💡
The latent image
When photons strike the emulsion, electrons are released and silver ions cluster into tiny metallic silver specks. These specks are too small to see — the "latent image" — but they mark where light landed.
⚗️
Development
The developer amplifies the latent image, reducing silver ions to metallic silver. The image appears as dark where light hit (a negative). Fixer then removes unexposed silver halides, making it permanent.
🎨
Color film layers
Color negative film has three emulsion layers, each sensitive to red, green, or blue light. During development (C-41 process), dye couplers form cyan, magenta, and yellow dyes that recreate the original colors.
🎞️
Upload as analog-film-guide-chemistry
Suggested: macro close-up of 35mm film strip, or negatives held up to light.
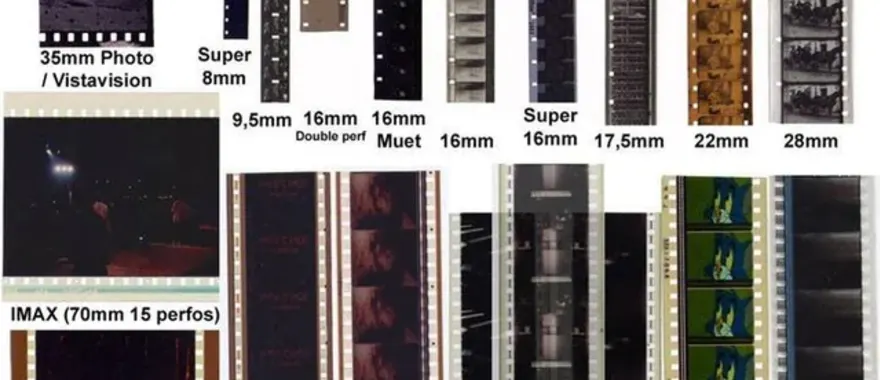
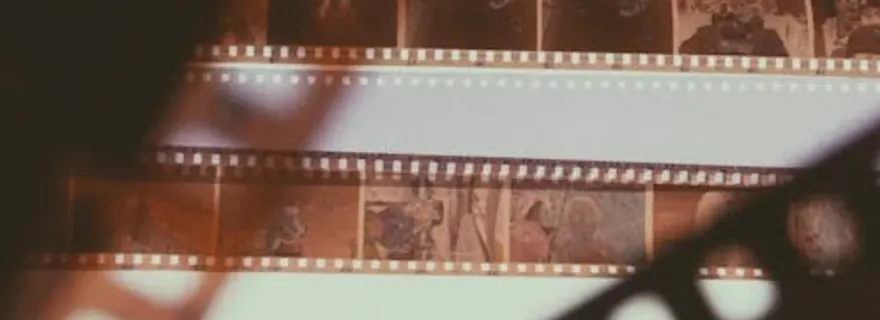
A 35mm negative strip — the emulsion side contains silver halide crystals that react to light, forming the latent image before development.
ISO / ASA — film speed
ISO (historically called ASA) measures how sensitive a film is to light. Higher ISO = more sensitive = usable in darker conditions but more grain. Unlike digital, you can't change ISO mid-roll — you're committed to whatever speed you loaded.
50–100
Slow film
Ultra-fine grain, exceptional detail. Bright outdoor daylight only. Great for landscapes and studio work.
200–400
Versatile
The sweet spot for most shooting. Works in daylight and overcast. 400 handles indoor light near windows.
800–1600
Fast film
For low light, gigs, street at night. Noticeable grain that many photographers treat as part of the aesthetic.
3200
Extreme
Very grainy, high-contrast look. Ilford Delta 3200 and Kodak T-Max P3200 are made for dark venues and available light work.
💡
Pushing and pulling: You can tell the lab to develop your film as though it were a higher ISO than it's rated (pushing) or lower (pulling). Pushing one stop means shooting ISO 400 film as if it were ISO 800. It increases contrast and grain but rescues underexposed shots. Most labs charge a small fee for pushed development.
Beyond format and ISO, the type of film you choose dramatically affects the character of your images. The main distinctions are color vs. black & white, and negative vs. reversal (slide) film.
🎞️
Color negative (C-41)
The most common type. Produces a color negative that can be scanned or printed. Very forgiving of overexposure — you can often overexpose by 1–2 stops and still get a usable image. Processed with the standardised C-41 chemistry available at most labs. Great starting point for beginners.
⚫
Black & white negative
Classic, timeless look. Processed with a variety of developer chemistries (D-76, HC-110, Rodinal) that each give different tonal qualities. Easy to home-develop — B&W chemicals are safer than color processes and don't require temperature control as tight as C-41.
✨
Color reversal (slide / E-6)
Produces a positive transparency — the film itself is the final image. Colors are vivid and saturated, contrast is higher, and exposure must be precise (very little latitude). Processed with E-6 chemistry, which fewer labs offer. Famous stocks: Kodachrome (discontinued), Fujifilm Velvia, Provia.
📸
Instant film
Self-developing packs (Polaroid/Polaroid Original, Fujifilm Instax). The chemistry is self-contained — you expose and the image develops in front of you over minutes. No lab needed. Expensive per shot but uniquely tactile and social. Great for events and gifting prints.
🎨
Upload as analog-film-guide-film-types
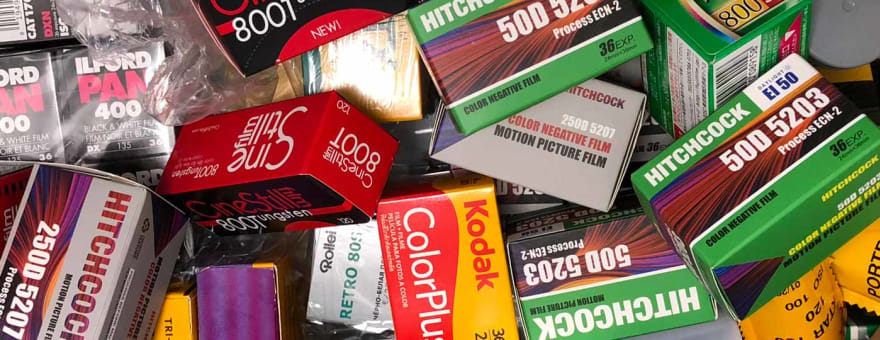
Suggested: flat lay of mixed film boxes/canisters — Kodak Portra, Ultramax, Fuji Superia, Ilford HP5, etc.
The same scene shot on different film stocks will yield dramatically different results — colour palette, grain structure, and tonal rendering each have a distinct character.
"Expose for the shadows, develop for the highlights" — the film photographer's first principle.
Popular film stocks to try
🟡
Kodak Gold 200
Color Negative · ISO 200
Affordable, widely available, warm tones. The classic roll for sunny holidays. Excellent starting point for new film shooters.
🟠
Kodak Portra 400
Color Negative · ISO 400
The industry standard for portrait photography. Extremely fine grain for ISO 400, beautiful skin tones, and exceptional latitude. A professional favourite for decades.
🟢
Kodak Ultramax 400
Color Negative · ISO 400
Punchy, saturated consumer film. More contrast than Portra. Great for street photography and travel where you want bold, immediate images.
🔵
Fujifilm Superia 400
Color Negative · ISO 400
Fuji's cool, green-leaning palette. Great fine grain. A different character from Kodak — preferred by many for outdoor and everyday shooting.
🟣
Fujifilm Velvia 50
Color Reversal · ISO 50
Hyperreal colour saturation and punchy contrast. The landscape photographer's slide film. Demands accurate exposure — but when it's right, it's breathtaking.
⬜
Ilford HP5 Plus 400
B&W Negative · ISO 400
One of the most versatile B&W films made. Excellent latitude, pushes well to 1600 or 3200. Classic grain structure, punchy midtones. A lifelong favourite.
🔲
Kodak Tri-X 400
B&W Negative · ISO 400
The grain-heavy, high-contrast B&W film of photojournalism. Henri Cartier-Bresson, Robert Frank, Garry Winogrand all shot it. Unmistakable look when pushed.
⬛
Ilford Delta 3200
B&W Negative · ISO 3200
Extreme speed for concerts, theatre, available-light work. Bold grain that becomes an aesthetic in itself. Push it further to 6400 for an even more gritty look.
⚠️
Kodachrome is gone: The legendary Kodachrome — the film of Paul Simon's song and National Geographic covers — was discontinued in 2010. The last lab to process it, Dwayne's Photo in Kansas, closed its Kodachrome line simultaneously. It cannot be home-processed; only Kodak's own process worked. Original slides are collector's items. If you want that vivid transparency look, Fujifilm Velvia is the closest living equivalent.
Film cameras come in a wide variety of types, each with different strengths, ergonomics, and ideal use cases. Here's a breakdown of the main categories you'll encounter.
📸
Upload as analog-film-guide-cameras
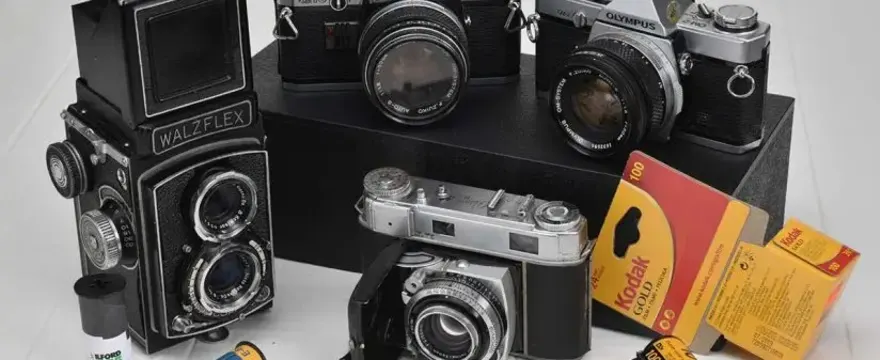
Suggested: flat lay or group shot of different film camera types — SLR, rangefinder, TLR, point & shoot together.
A cross-section of film camera types — from left to right: a rangefinder, SLR, TLR, and 35mm point & shoot, each with a distinct shooting experience.
Upload: analog-film-guide-slr
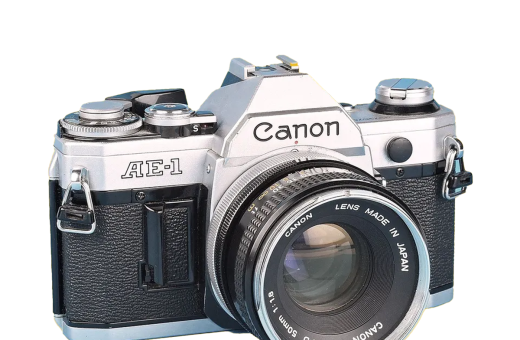
Uses a mirror and pentaprism to let you see exactly what the lens sees through an optical viewfinder. This "what you see is what you get" system made SLRs the dominant camera type for professionals through the 1970s–90s. Interchangeable lenses — any lens made for the camera's mount will work (Canon FD, Nikon F, Pentax K, Minolta SR, etc). Typically have aperture-priority and shutter-priority auto modes on later models, or fully manual on earlier ones.
Canon AE-1
Pentax K1000
Nikon FM2
Minolta X-700
Olympus OM-1
Best for: beginners wanting full control and interchangeable lenses.
Upload: analog-film-guide-rangefinder
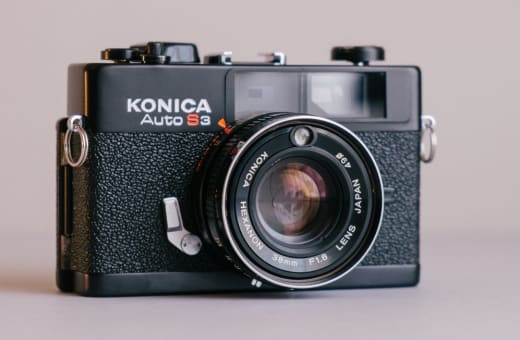
Focuses using a rangefinder patch — a secondary image in the viewfinder that you align with the main image by turning the focus ring. No mirror means a quieter shutter and a viewfinder that lets you see outside the frame, making it easier to anticipate action. The Leica M-series is the gold standard; affordable alternatives include the Voigtländer Bessa and the Soviet-era Zorki/FED cameras. Depth of field is harder to visualise than on an SLR.
Leica M6
Voigtländer Bessa R2
Canonet QL17
Zorki-4
Best for: street and documentary photography; quiet, unobtrusive shooting.
Upload: analog-film-guide-point-shoot
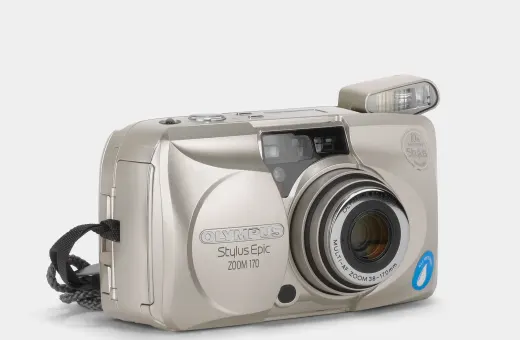
Fixed-lens (or limited zoom) cameras with autofocus, built-in flash, and automatic exposure. You load the film, set the ISO, and shoot. The camera handles everything else. Premium 1990s models like the Olympus Stylus Epic (MJU-II) and Nikon 35Ti rival SLRs for optical quality. More affordable options include the Canon Sure Shot and Minolta Freedom series. The Stylus Epic in particular has become sought-after enough to sell for £200+ used.
Olympus Stylus Epic
Nikon L35AF
Canon Sure Shot
Ricoh GR1s
Best for: casual shooting, travel, beginners who want simplicity.
Upload: analog-film-guide-tlr
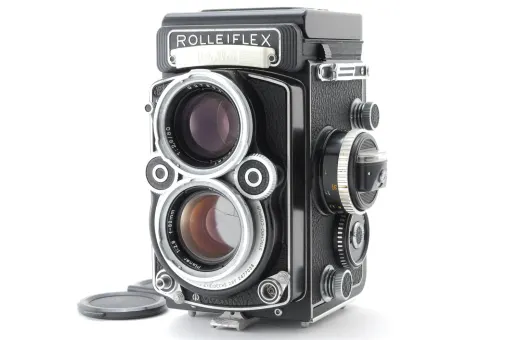
Uses two lenses stacked vertically — one for viewing (with a mirror), one for exposing the film. You compose looking down through a waist-level finder. Shoots 6×6 square frames on 120 film. The viewfinder image is reversed left-to-right, which takes getting used to. No interchangeable lenses on most models (the Rolleiflex is fixed-lens). The Rolleiflex is the iconic TLR; the Yashica Mat-124G is an affordable alternative with similar quality.
Rolleiflex 2.8F
Yashica Mat-124G
Mamiya C330
Best for: portrait, street (discreet waist-level), square-format work.
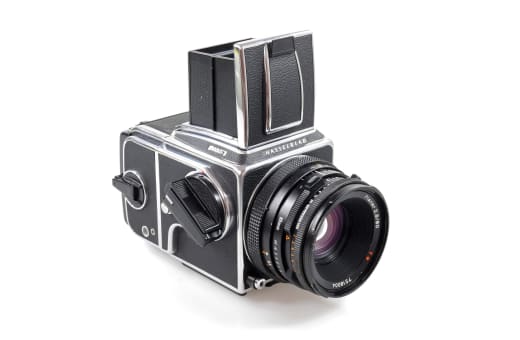
Upload: analog-film-guide-medium-format
Full SLR design using 120 film. Interchangeable lenses, backs (swap mid-roll!), and finders. The Hasselblad 500 series is the most famous camera system ever made — used by NASA on the Moon. More accessible options include the Mamiya RB67 and Pentax 67, which shoot large 6×7 frames. All are heavy, deliberate cameras suited to portrait, fashion, and landscape where you have time to set up each shot.
Hasselblad 500C/M
Mamiya RB67
Pentax 67
Bronica SQ-A
Best for: portrait, landscape, studio — maximum film quality.
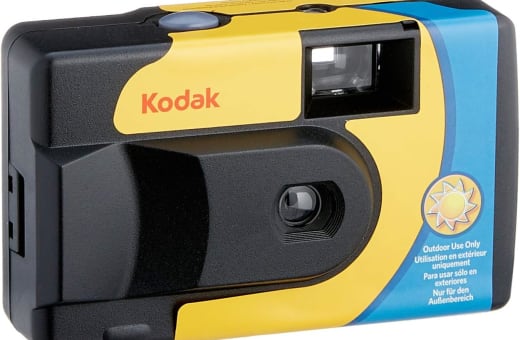
Upload: analog-film-guide-disposable
A fixed-focus plastic lens camera with a roll of film pre-loaded, typically ISO 400 or 800. Shoot until empty, hand the whole camera to the lab. Results are low-resolution by modern standards but have a characteristic lo-fi quality that has a lot of fans. Kodak FunSaver and Fujifilm QuickSnap are the mainstream options. A reusable alternative: the Kodak M35 (same optical quality but reloadable).
Kodak FunSaver
Fujifilm QuickSnap
Kodak M35 (reusable)
Best for: events, weddings on tables, absolute beginners.
Loading film incorrectly is the most common mistake new film shooters make. If the film isn't advancing, every frame you think you're capturing is blank. Here's how to load correctly.
1
Open the back in subdued light
Find the back-release lever on the camera body (usually on the left side or base). Open the back. Don't open in direct sunlight — subdued indoor light or shade is fine for 35mm (it's in a light-tight canister).
2
Drop the canister into the film chamber
Place the film canister (the silver/grey cylinder) into the left-hand chamber. On most cameras the spool end goes down. Pull the film leader (the tapered strip of film) across the camera back towards the right-hand take-up spool.
3
Slot the leader into the take-up spool
The take-up spool has a slot or grooves on the right side. Slide the tip of the leader in firmly. Make sure the sprocket holes on both top and bottom of the film are engaged with the sprocket drive teeth in the camera. This is the critical step most people miss.
4
Advance two frames before closing
Before closing the back, slowly advance the film (cock the shutter and advance, or use the thumb lever) and watch the film move. The film should pull taut from the canister and the sprocket wheel should rotate. Advance one full frame before closing.
5
Close and advance to frame 1
Close the back firmly. Advance and fire the shutter twice (these frames are the unexposed leader, which was exposed to light when you opened the back). The frame counter should now read "1." You're ready to shoot.
6
Check the rewind knob turns as you advance
This is the key verification: as you advance the film, the rewind knob (top left) should rotate slightly. If it doesn't move, the film isn't advancing — open the back, check the sprockets, and reload.
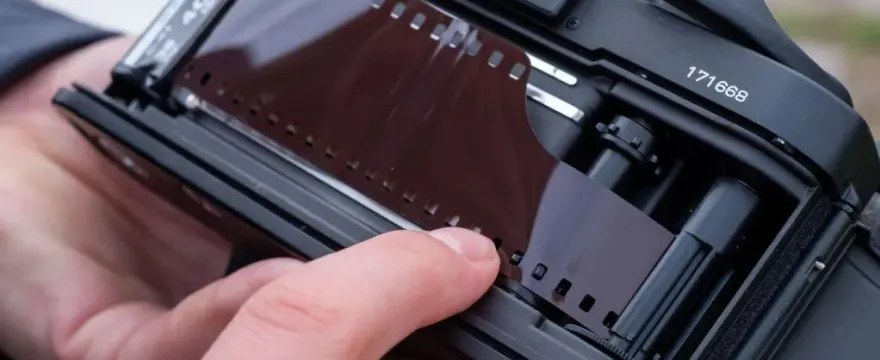
🎞️
Upload as analog-film-guide-loading
Suggested: hands threading film into camera back, showing the take-up spool and sprocket holes.
The critical moment: film leader threaded onto the take-up spool, both rows of sprocket holes engaged. Advance slowly and watch the rewind knob rotate to confirm it's feeding correctly.
Rewinding and unloading
!
Never open the back mid-roll
Opening the back with film loaded will immediately expose and ruin all frames. Always rewind first. If the back opens accidentally, shield the camera and take it to a dark room immediately — some frames nearest the canister may be salvageable.
1
Rewind the film
When you hit the end of the roll, the advance lever will feel stiff — stop. Depress the film-release button (usually on the base), then crank the rewind wheel/lever (top left) in the direction shown by the arrow. Keep going until you feel resistance drop — the leader has been pulled fully into the canister.
2
Open the back and remove the canister
Open the back — now safe — and remove the canister. Note: some photographers stop rewinding before the leader disappears into the canister, leaving a short strip out. This is a personal choice; it makes it easier to reload if you want to (for mid-roll changes), but most labs don't require a protruding leader.
Loading 120 medium format film
120 film is loaded differently. It doesn't come in a canister — it's a spool of film with paper backing. The exact mechanism varies by camera, but the general process is:
1
Move the empty take-up spool
120 cameras have two spool positions. Remove the empty spool from the supply side and move it to the take-up side (right). The fresh roll of film goes in the supply side.
2
Thread the paper leader to the take-up spool
Pull the paper leader across the film gate. Slot it into the take-up spool and advance until the arrows on the paper align with the film gate markers. Close the back.
3
Wind to frame 1
Advance (via the winding knob or crank) until the frame counter (or red window on the back) shows "1." You're now on the first frame. On some cameras this advance happens automatically.
The fundamentals of exposure — aperture, shutter speed, ISO — work identically on film and digital. But film rewards a different mindset. Here's what to bear in mind.
⚖️
Expose to the right
For color negative film, err on the side of slight overexposure (half a stop to one stop over). Color negative film handles overexposure gracefully — it retains highlight detail and reduces grain. Underexposure is much less forgiving and produces blocked shadows and muddy colours. The opposite applies to slide film: expose accurately or slightly under.
🌡️
Match ISO to the light
Bright sunshine → ISO 100–200. Overcast outdoors → ISO 200–400. Indoors near a window → ISO 400. Indoors artificial light → ISO 400 or 800. You can't change ISO mid-roll without rewinding, so think about the range of situations you'll shoot before you load.
🎯
Use a hand-held light meter
Older manual SLRs (Pentax K1000, Nikon FM) have built-in meters. If your camera doesn't have a working meter, a hand-held meter (Sekonic L-308S is popular) or even a smartphone app (Lux Meter, Kodak Professional) will do the job accurately.
🧘
Slow down — you have 36 shots
The scarcity of frames is a feature, not a bug. Take time to compose. Think about the light, the background, the moment. Film photographers often say their keeper rate — the ratio of good frames to total frames — is higher with film than digital, because deliberate shooting produces more intentional images.
📝
Keep notes
When you're learning, note the settings you used for each frame (a small notebook, or voice notes on your phone). When you get the developed negatives back, you'll be able to correlate the results with your exposure decisions — the fastest way to improve.
☀️
The Sunny 16 rule
No meter? In bright direct sunlight, set your aperture to f/16 and your shutter speed to 1/ISO. ISO 200 film → 1/200 at f/16. In open shade, use f/8. Overcast, use f/5.6. It works remarkably well for color negative film's generous latitude.
⚠️
Airport X-ray machines: Film ISO 400 and under can usually survive consumer X-ray machines (baggage scanners) a few times. ISO 800 and above is more vulnerable. High-powered CT scanners used at some airports for carry-on bags will ruin any film. Always carry film in your carry-on bag and request a hand inspection. Most airport security staff are familiar with the request.
Film degrades. Heat, humidity, and light are the enemies of both unexposed film and developed negatives. Proper storage is simple but important.
Unexposed film
🧊
Refrigerate for long-term storage
Keeping film at 4°C (fridge temperature) significantly slows emulsion degradation. Seal the roll in a zip-lock bag to prevent condensation. Remove from the fridge at least 30–60 minutes before shooting to let it warm to room temperature — condensation on the emulsion can cause problems.
🌡️
Keep away from heat
Never leave film in a hot car. The temperature inside a parked car on a sunny day can reach 60–70°C — enough to significantly degrade the emulsion in minutes. ISO sensitivity shifts, colour balance changes, and contrast increases unpredictably.
🌑
Keep in original packaging
The film canister or box provides adequate light protection. Once you load a camera, store it away from direct sunlight. Don't leave an unboxed roll sitting in a bright windowsill — canisters are light-tight but the seal at the slot can let in light over time.
Developed negatives
Once your film is developed and scanned, the physical negatives are the master archive. Treat them with care.
📁
Negative sleeves or binders
Store strips of negatives in acid-free polyethylene or polypropylene sleeves. Avoid PVC sleeves — they off-gas plasticisers that attack the emulsion over decades. Print File and Kenro are popular UK brands. Use ring binders with punched sheets to keep rolls organized.
🏷️
Label and date everything
Write on the sleeve or use labels: date shot, film stock, ISO, whether pushed. You'll be glad of this in five years when you're looking for a specific roll. Keep a separate index if you shoot a lot.
🌡️
Cool, dry, dark storage
A cool room (below 21°C), low humidity (30–50% RH), and darkness is all you need. Avoid basements with damp issues. Professionals use dedicated archive boxes; for most photographers, a drawer in a cool room works perfectly well for decades.
🖥️
Keep a digital backup
Negatives can be damaged, lost, or destroyed. If the lab scans your rolls (most do), back up the scans immediately to at least two locations — a hard drive and cloud storage. The negative is the master, but a scan is a working copy and a safety net.
Once you've shot a roll, it needs to go through chemical development before you can see the images. You have three main options: a local lab, a mail-in lab, or home processing.
🏪
Local film lab
The most personal option. Turnaround of 1–5 days typically. You can discuss push processing, cropping, and print sizes face-to-face. Labs are increasingly common in cities as film has revived — search for "film lab" in your city. They can also offer hand-developed C-41 or E-6 for better control than high-street options.
📮
Mail-in lab (UK)
Highly recommended if there's no local lab. Post your rolls; get scans emailed back within days. Well-known UK labs include Filmdev, ThemePhotoLab, and Snappy Snaps (for basic C-41). Most offer develop-only, develop + scan, or develop + scan + prints. Scans come as high-resolution JPEGs or TIFFs.
🔬
Home development
B&W film is the easiest to home-develop. You need a daylight developing tank (Paterson System 4 is standard), a thermometer, and chemicals (developer, stop bath, fixer). The entire process can be done at home with £50–80 of equipment. C-41 home development is possible but requires strict temperature control (38°C ± 0.3°C).
💻
Scanning options
Most labs include basic scanning with development. For better scans, ask for high-resolution or TIFF files. You can also scan at home with a dedicated film scanner (Plustek 8200i for 35mm, Plustek 120 for medium format) or use a DSLR/mirrorless + macro lens to copy negatives. A lightbox and DSLR setup produces excellent results.
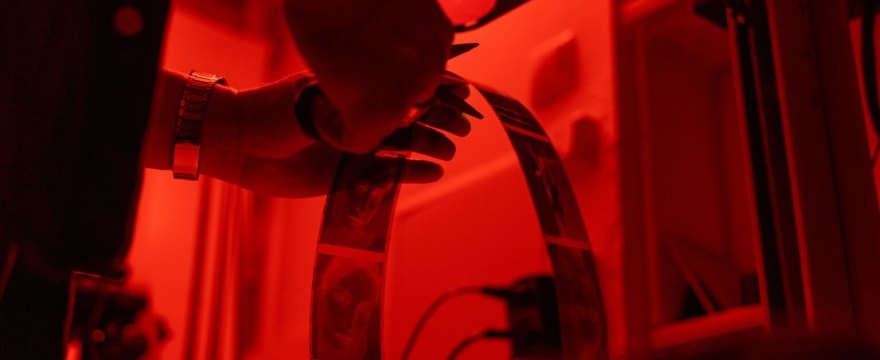
🔬
Upload as analog-film-guide-developing
Suggested: film hanging to dry, darkroom chemicals, or a flatbed/dedicated film scanner setup.
Most labs develop and scan in the same workflow — you receive high-resolution digital files within days, with the original negatives returned to archive.
ℹ️
Process codes: C-41 is for color negative film (most print film). E-6 is for color reversal/slide film. B&W film has many compatible developers. Instant film develops itself. Always tell the lab which process you need — sending slide film to a C-41 lab will produce a usable but incorrect result (cross-processing), which is sometimes done intentionally for an effect.
💡
First roll advice: On your very first roll, use ISO 400 color negative film (Kodak Ultramax or Ilford HP5 for B&W) in decent light. Don't stress about perfect exposure — color negative film's latitude will forgive a lot. Send it to a lab with scanning included. Look at the results critically: what worked, what was blurry (likely camera shake or focus), what was too dark or too bright. Your second roll will be noticeably better.
← Back to all guides